Format basics
You'll read a sprite file, draw a gem of your own in a text editor, and then have the gem share its colors with a street lamp, so both can switch to dusk together.
The idea
A pxart sprite is a plain text file ending in .px. It has two parts. First come the
colors, one per line: a letter, then a hex color. Then comes the picture, drawn with those
letters, one letter per pixel. From barrel.px:
b #9b6440
B #5e3a2a

....kkkkkkkk....
...kBbbbbbbbk...
So b is a light brown and B a dark one, and the second row of the barrel starts with
three empty pixels, an outline pixel, a dark one, then light ones. A . is always an
empty (see-through) pixel; you never list it.
Because it's text, you can make and change a sprite in any editor, and pxart turns it into pictures.
Before you start
From this folder, copy just the source files into a new folder of your own and go there. The commands below then make every output fresh, and print exactly what's shown here:
mkdir -p ~/pxart-01
cp barrel.px gem.px lamp.px palette.px ~/pxart-01/
cd ~/pxart-01
~ is your home folder, and -p keeps mkdir quiet if the folder is already there.
The examples README says how to make pxart a command you can type.
Step 1: Look at the barrel
Open barrel.px in a text editor. The top of it is:
# A barrel from the harbor-market pack: a palette, then the grid.
pxart 1
k #2b1e2f
G #5d5869
b #9b6440
B #5e3a2a
h #6e4230- A line starting with
#is a comment, for people. pxart 1says which version of the format this is. It usually comes first, after any comments, but it's optional.- The five letter lines are the barrel's colors (its palette). Each letter is a key.
After a blank line, the grid: 16 rows of 16 letters. Now draw it:
pxart render barrel.px -o barrel.preview.png --pngrenderdraws a preview for looking at while you edit: every pixel as an 8x8 block, with a grid and rulers so you can count pixels.-o barrel.preview.pngis the output file.--pngalso saves the sprite at its real size, one image pixel per sprite pixel, asbarrel.pngbesidebarrel.px. That small file is what a game would use.
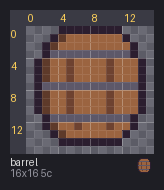
The grey checkerboard shows the empty . pixels.
Step 2: Draw a gem
Make a new file called gem.px and type this into it (the folder already has a copy, if
you'd rather not type):
# A gem: four colors, then the picture, one letter per pixel.
pxart 1
k #2b1e2f
w #efe6d2
p #d8718c
r #c4473a

..kkkkk..
.kwppprk.
kwwppprrk
kwpppprrk
.kwpprrk.
..kpprk..
...kpk...
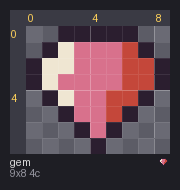
....k....k is the outline, w a white shine on the upper left, p the pink body and r the
red shadow on the right. Every row has to be the same width, here 9.
Draw it bigger, since it's only 9x8 pixels:
pxart render gem.px --scale 16 -o gem.preview.png--scale 16 draws every pixel as a 16x16 block instead of render's usual 8x8.
Step 3: A sprite with no colors of its own
Open lamp.px. It has a grid but no color lines. Instead it has this:
pxart 1
@palette palette.px
@palette palette.px means "take my colors from palette.px". That file
is only colors: the harbor pack's 20 keys, which all its sprites share. Change a color
there and every sprite that uses it changes.
pxart render lamp.px -o lamp.preview.png --png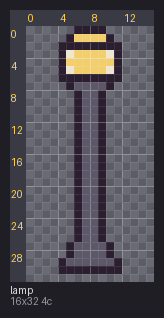
Step 4: Give the gem the shared palette
The gem's four colors are the same as four in palette.px, so the gem can share that
palette too. palette --import does it for you:
pxart palette gem.px --import palette.px -o gem-shared.pxpalette gem.px --import palette.pxadds@palette palette.pxto the gem and drops its own color lines, sincepalette.pxhas the same colors.-o gem-shared.pxwrites the result to a new file and leavesgem.pxas it was.
pxart says what it did:
imported palette.px (@palette palette.px); dropped k w p r (their key lines: the same colors in palette.px); gem-shared.px now has palette.px's @variant dusk; wrote gem-shared.pxThe top of gem-shared.px is now just:
# A gem: four colors, then the picture, one letter per pixel.
pxart 1
@palette palette.px
The picture is untouched, so it draws exactly the same.
Step 5: Dusk for free
palette.px has a second set of colors, called dusk, after a line @variant dusk
near its end. Anything that uses the palette can be drawn in those colors instead.
render takes several files at once:
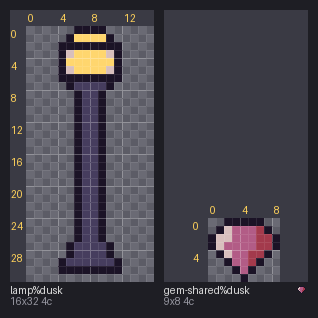
pxart render lamp.px gem-shared.px --variant dusk -o dusk.preview.png--variant dusk draws with the dusk colors, and each label says so (lamp%dusk). You never
picked a dusk color for the gem: it got them by sharing the palette.
03 · Palette variants shows how to make variants like dusk yourself.
The picture at the top
scene places sprites on one canvas and saves a PNG, each at an x,y position (the
sprite's top-left corner). %dusk after a file name draws that one sprite in its dusk
colors:
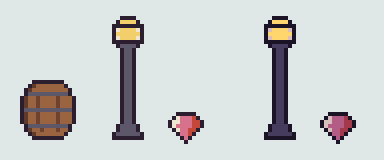
pxart scene --size 96x40 --bg '#dfe8e6' -o shelf.x4.png \
  barrel.px@4,20 lamp.px@24,4 gem-shared.px@42,28 lamp.px%dusk@62,4 gem-shared.px%dusk@80,28
--size 96x40 is the canvas in pixels, and --bg its background color (quoted, so the
shell doesn't read # as a comment). scene scales everything up 4x unless told
otherwise, hence the .x4 in the name.
Try it yourself
- Recolor the gem. In
gem.px, changep #d8718ctop #3f7fa8andr #c4473ator #26496e(the pink and its red shadow become two blues), and run the Step 2 command again for a blue gem. - Hide the grid.
pxart render gem.px --scale 16 --no-grid -o plain.pngdraws the gem without the grid lines. - See who shares the palette.
pxart palette palette.px --in .lists every color and says how many.pxfiles in this folder use it.
Commands used
pxart render FILE... -o OUT.png: a preview to look at while you edit.pxart help renderpxart palette FILE --import P.px -o OUT.px: make a sprite use a shared palette file.pxart help palettepxart scene --size WxH -o OUT.png ITEM@x,y ...: place sprites on one canvas.pxart help scene
The Commands section of the main README covers all of them.
examples/01-format/README.md in the repository.Edit on GitHub