Scenes and maps
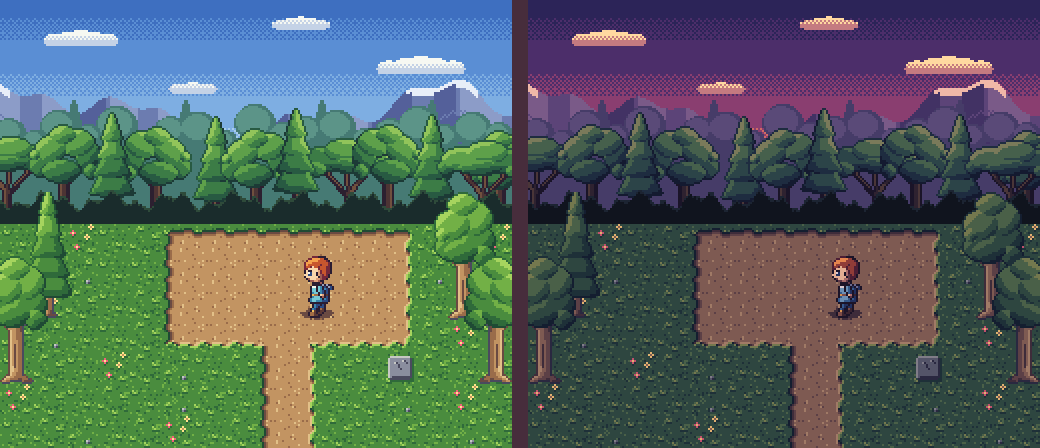
You'll lay out a forest glade from 16x16 tiles in a plain text file, stack a sky, a tree line and some trees over it in layers, put the hero in the middle, and render it by day and at dusk.
The idea
Games build their levels from small square tiles: grass, a path edge, a path corner.
A .map file is a text picture of a level. First it says which letter stands for which
tile, then it draws the level with those letters, one letter per tile. Two lines from
rooms/glade.map:
a ../tiles/field.px:grass_aabfab1NNNNNN2bafThe first says a means the grass_a frame of tiles/field.px. The second is one row
of the level: 16 tiles, 16 pixels each, so 256 pixels across. scene --map turns the
whole file into one picture.
Before you start
From this folder, copy just the source files into a new folder of your own and go there. The commands below then make every output fresh, and print exactly what's shown here:
mkdir -p ~/pxart-06
cp -R rooms pal layers tiles sprites ~/pxart-06/
cd ~/pxart-06
~ is your home folder, and -p keeps mkdir quiet if the folder is already there. -R copies the folders with everything in them.
The examples README says how to make pxart a command you can type.
The folder is laid out like a small game: tiles/ holds the tile sheets, layers/ the
big background pictures, sprites/ the hero, pal/ their palettes, and rooms/ the map.
Step 1: Read the legend
Open rooms/glade.map. It starts with a comment, then the legend:
22 lines, each a letter and a frame. A few of them:
F ../layers/far.px:far
a ../tiles/field.px:grass_a
N ../tiles/field.px:path_n
1 ../tiles/field.px:path_nw
T ../tiles/tree.px:tree+b
t ../tiles/tree.px:tree+hb- The paths start from the map file's own folder,
rooms/, so../tiles/field.pxistiles/field.pxin this folder. Fis the whole sky, one 256-pixel-wide picture. It's drawn at its letter's cell, like any tile, and simply covers more than one cell.Nis the path's top (north) edge and1its top-left (north-west) corner. The map needs a tile for every edge and corner of the dirt path.+bstands a frame on the bottom of its cell, centered. A tree is 32x64, much bigger than its 16x16 cell, so it grows up out of it.+hbdoes the same and also flips the tree left to right (hfor horizontal), so the two edges of the glade don't look copied.
Step 2: Read the rows and the layers
After the legend comes a blank line, then the rows. . is an empty cell. A line ---
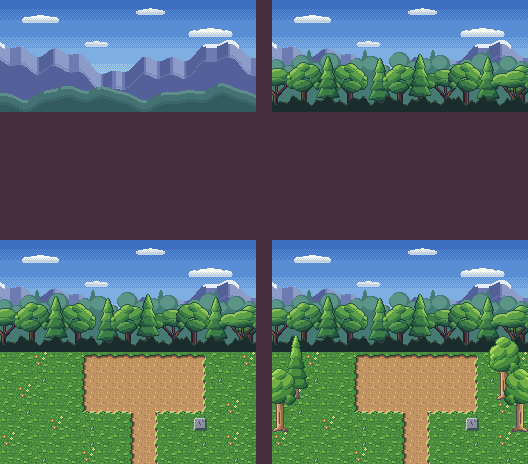
starts a new layer: another set of rows, drawn over the ones before. The glade has four:
- the sky
F, in the top-left cell; - the tree line
M, in the third row; - the ground: grass, flowers and the dirt path, in the bottom seven rows;
- the trees
T,tandP, over the grass.
The bottom seven rows of layers 3 and 4 (rows 7 to 13 of the map's 14), side by side:
abfab1NNNNNN2baf        ................
bacaaWppppppEcab        ................
afbabWppppppEaba        .P............T.
bcaab3SS78SS4bfa        ................
abafbcabWEbasbab        T..............t
fbabacbaWEabcafb        ................
abcabfabWEbabacb        ................
In layer 3, 1NNNNNN2 over W....E over 3SS78SS4 is the edge of the square of path,
and 78 are the corners where the path turns down. In layer 4, each tree sits on a grass
cell of the layer below.
Here are the first layer alone, then the first two, three and all four (build.sh makes this picture; you don't need to):
Step 3: Check the map
Before rendering, check reads the whole map and every file it names:
pxart check rooms/glade.mapok rooms/glade.map: map 16x14 tiles, 22 legend char(s), 4 layers16x14 tiles of 16 pixels is 256x224, the size of a Super Nintendo screen. A misspelled frame name or a missing file would show up here, with its line number.
Step 4: Render the glade with the hero
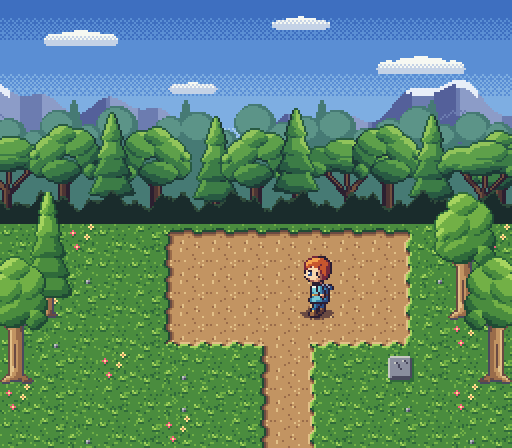
pxart scene --map rooms/glade.map --scale 2 -o glade.x2.png \
  tiles/field.px:shadow_s@150,154 sprites/hero.px:walk/left/0@147,127
--map rooms/glade.mapdraws the map first, all four layers.--scale 2draws each pixel as a 2x2 block (scene's usual is 4).- The items after it are drawn on top, each
FILE:FRAME@x,ywith x,y its top-left corner in pixels: a small shadow, then the hero standing on it.
note: 308 px of the map fall outside the 256x224 scene (size from --map) and were croppedThat note is expected: the trees in the edge columns hang past the sides of the map, and the parts outside are cut off.
Step 5: Render it at dusk
Every palette in pal/ has a dusk variant (see 03 · Palette variants).
--variant dusk renders every tile and item in it:
pxart scene --map rooms/glade.map --scale 2 --variant dusk -o glade-dusk.x2.png \
  tiles/field.px:shadow_s@150,154 sprites/hero.px:walk/left/0@147,127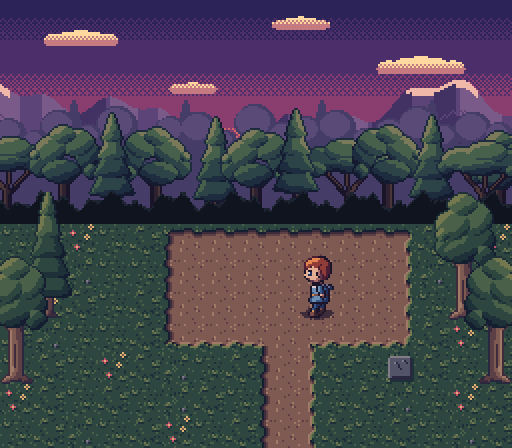
Step 6: Turn the map into one sprite
A PNG is a dead end: you can't recolor it or switch it to dusk later. compose --map
builds the same picture as a .px file instead, one 256x224 frame with all the tiles'
colors and their dusk:
pxart compose --map rooms/glade.map -o glade.px --rekey \
tiles/field.px:shadow_s@150,154 sprites/hero.px:walk/left/0@147,127 --replace--rekeyis needed because the four palettes use some of the same letters for different colors; it gives the clashing ones free letters inglade.px(05 · Compose across packs explains it step by step).--replacestartsglade.pxover if your copy of the folder already has one.
It prints five notes and wrote glade.px (all in compose.txt). One
counts the letters it rekeyed in each file:
...
note: --rekey gave 18 keys free ones in glade.px: rooms/../layers/mid.px 7, rooms/../tiles/field.px 3, rooms/../tiles/tree.px 2, sprites/hero.px 6 (the files are unchanged)
...
note: that's 7 notes in short; -v prints each in full
The last one says they stand for seven. With -v, compose prints each in full: which
letters became which (the hero's S is I in glade.px), and which layers left out a
color, by number, like layers 115-118 (rooms/../tiles/tree.px). Those aren't the map's
four layers: compose stacks every tile the map places as a layer of its own, in order.
Here that's 118 of them: the sky, the tree line, 112 ground tiles and the 4 trees, so the
trees are layers 115 to 118.
check confirms it's one frame, 256x224, with 51 colors:
pxart check glade.pxok glade.px: 256x224 51c
glade.px: unused keys befy (no frame draws with them: 'pxart palette glade.px --remove b,e,f,y' drops them; compose and crop give a new OUT their sources' whole palettes unless --used-keys-only)The second line is a note, not an error: glade.px got every color of the four
palettes, and four of them (b e f y) aren't drawn anywhere. They do no harm; the note
says how to drop them.
pxart scene --size 256x224 --scale 2 -o check.png glade.px%dusk@0,0 draws it, and the
picture is the same as Step 5's, pixel for pixel.
The picture at the top
The two renders side by side (--scale 1 keeps them the size they are):
pxart scene --size 1040x448 --scale 1 -o panels.x2.png glade.x2.png@0,0 glade-dusk.x2.png@528,0Try it yourself
- Move a tree. In the last layer of
glade.map, move thePin.P............T.a few cells to the right and render again. - Plant a pine. The last layer's bottom row is empty. Change it from
................to...P............, render again, and a second pine stands in the grass at the bottom left. - Mirror the hero. Add
+hto his frame,sprites/hero.px:walk/left/0+h@147,127, and he faces right.
Commands used
pxart check FILE.map: read a map and every file it names.pxart help checkpxart scene --map FILE.map -o OUT.png [--variant V] [ITEM@x,y ...]: render a map, with items on top.pxart help scenepxart compose --map FILE.map -o OUT.px --rekey: the same, as a.pxfile.pxart help compose
The Commands section of the main README covers all of them.
examples/06-scene/README.md in the repository.Edit on GitHub